We all know science experiments are a great teaching method for kids in the classroom. Did you know there are tons of great experiments you can do with your children at home? Maybe you are in the midst of winter boredom or a sweltering summer where it is just too hot to play outside. These science experiments for kids are sure to bust any lurking boredom!
Kids thrive on being curious and engaged. Through experiments, kids can learn to hypothesize, analyze, and conclude on their findings through hands-on play. This allows children to explore their curiosity through a scientific approach that will engage their minds and keep them entertained for hours!
Below is a list of some of the coolest science experiments that are perfect for kids. Not only will they have a ton of fun performing these experiments, but they will gain a great deal of knowledge along the way! To make the most of these experiments, be sure to ask your child questions along the way. What do you think will happen? Why do you think that reaction occurred? Are you surprised by the findings of this experiment? Asking these questions will further engage the child in the educational value of each experiment! And don’t forget to stop by and check out our favorite science kits for kids too!
Make sure to pin the image below and bookmark this page, so you can come back and keep trying these cool science experiments!
Note: These fun science experiments have been condensed into easy, step-by-step instructions. If for any reason, you are confused or would like more detailed instructions, visit the link provided within each experiment. You can always reach out to us via our contact page too. Enjoy!
1. Crazy Dancing Rice Experiment

Image source: Green Kid Crafts
This safe and easy science experiment is suitable for preschoolers and elementary students. You will need the following materials that can be easily found in the kitchen:
- Rice
- White vinegar
- Baking soda
- Water
- Food coloring (optional)
Fill a clear jar a little bit more than half way with water (3/4 of the way full is good) and mix in some food coloring (again this is totally optional, but adding food coloring makes the experiment much more fun). Stir in 1 tablespoon of baking soda until it completely disappears. Next, add ¼ cup of rice (must be uncooked!) and 2 tablespoons of vinegar.
The baking soda will react with the vinegar and create some fizzing. Then the rice will start to move or dance like crazy. Try adding in a little glitter next time you do this experiment and observe what happens. The kids absolutely love this fun science experiment!
2. Change The Color Of Flowers

Image source: Fun Learning For Kids
Teach elementary students how water defies gravity and travels up through the stems of plants. For this experiment, you will need some white carnations, food coloring, glass or plastic cups and water. Here is what you need to do:
- Trim the stems of white carnations so they can fit into glass or plastic cups
- Add water and different food colorings to each jar (make sure to add enough food coloring to each cup so the flowers have enough to soak up. I’d say around 15 or so drops works best)
- Place one carnation in each jar and wait
Ask children to observe and take notes while the magic happens! After several hours, the white petals will start to show streaks of color. In a couple of days, the flowers will have different vibrant colors and will look full of color!
3. Make Fake Snow

Image source: The Homeschool Scientist
For all of the kids who love snow or live in a place where it doesn’t get cold enough to snow, this science experiment is for you! Fortunately, with science, you can literally make your own snow. There are many different ways to make snow, but I will teach you three different ways that I’ve learned from a few people.
The first involves synthetic polymers (you know…the stuff that is found in diapers). For this experiment, you can buy the powder here. That is the only thing you’ll need! Pour a little of the powder into a cup or bowl and then add some water. Watch as the mound of powder magically turns into fluffy snow!
The second way to make fake snow is by using paper towels, baking soda and vinegar. Mix small pieces of paper towels with baking soda and then add vinegar. This recipe will create fluffy snow that can be shaped into balls for lots of fun. It also feels crunchy too.
The last easy way to make fake snow is by using just baking soda and water. Yes, it’s that easy! Pour out some baking soda into a bowl or cup and add a little water. Continue adding enough water until it is formable. Try to form it into a snowball and then squeeze it!
This is an amazing sensory activity for toddlers and preschoolers.
4. Rainbow In A Tube

Image source: Little Bins For Little Hands
This activity takes some time and patience, but it will teach kids about the effect of density. You will need water, 6 glasses, 6 different shades of food coloring, a test tube (or mason jar), a baster and lots of sugar.
Start by adding one cup of water to each glass. It’s important that you measure out exactly one cup of water for each glass, otherwise the experiment may not work as planned.
Go back to each glass and put in a few drops of food coloring. Make sure each glass has a different color!
Set one of the glasses aside (doesn’t matter which color). Then add 2 teaspoons of sugar to the one of the other glasses, 4 to the next glass, 6 to the next color and so on. Remember… one of the glasses should contain colored water only with no sugar.
Make sure all of the sugar is dissolved in each glass (try your best to get it mixed in as best as possible. It’s okay if it’s not perfect).
Use the baster to pick some water from the glass with the most amount of sugar and put it in the test tube (or mason jar). Move to the second glass that contains less sugar until the one with no sugar goes on top.
Add the water very slowly and you will see how the denser water moves to the bottom of the tube or mason jar. Your rainbow will look awesome!
5. Self-Inflating Balloon

Image source: Relentlessly Fun, Deceptively Educational
Teach your kid the basics of chemistry using safe materials. For this activity, you will need an empty plastic bottle, baking soda, vinegar and a balloon.
This activity is best suited for 2 people. As you will see in one of the steps below, the faster you can get the balloon over the bottle tip, the better the experiment will work.
Add 1/3 cup of white vinegar to the plastic bottle. One person should hold the balloon and open it while another adds 3 teaspoons of baking soda. Adding the baking soda may make a mess! If you have a funnel, it will be much easier to dump the baking soda in.
Next, quickly stretch the balloon’s neck and fit it on top of the bottle and watch the balloon inflate. Vinegar reacts with baking soda to produce carbon dioxide gas, which inflates the balloon.
6. DIY Compass

Image source: Rookie Parenting
Using some simple supplies, you can teach kids how to create an external magnetic field. To do this experiment, you will need some paper, a needle, magnet, scissors and a bowl of water.
First, you will cut out a circle from the paper (about 2 inches in diameter will be just fine). Set this little circle aside for now.
Now it’s time to charge up your needle! To do this, you need to rub one end of the needle 30 times on one side of the magnet (make sure you are rubbing in the same direction or this experiment may not work). Flip the magnet over and rub the other end of the needle in the same direction for 30 times again.
Thread the needle twice, so it lays flat on top. Fill a bowl with water and place the home-made compass on top. See it rotate until it stops, pointing to the north.
This hands-on activity teaches kids about ferromagnets and is also so fun to watch.
7. Safe Plastic From Gummies

Image source: Steam Powered Family
With this cool science experiment, kids will enjoy making safe plastic from gummies.
You will need gelatin and food coloring for this activity. First, mix about 75mL of water with 3 gelatin packets into a pot and add some food coloring. Whisk on low heat until the gelatin has dissolved and the mixture starts to thicken. Take it off the heat now.
There may be some foam on the top layer, so if there is, try and scoop that out. Otherwise, your molds may become cloudy. Pour the mix into any type of silicon mold. After a couple of days, you will have safe plastic toys!
This activity shows kids that there are scientific ways to make safe products that don’t harm the environment. Let them experiment with various colors to create unique patterns.
8. Mystic Water

Image source: Schooling Active Monkeys
This experiment shows the effect of heat energy on molecules of matter. It is suitable for young and older students. All you need is water, primary shades of food coloring and laminated index cards. It’s important that the index cards are laminated!
- Fill 3 mason jars with hot water. Do the same with ice cold water on another 3 mason jars
- Stir in different shades of food coloring to each mason jar
- Place a laminated index card on top of each jar that has hot water. It should make a seal if you apply a little pressure
- Flip a hot water jar and line the lips up with a cold water jar. Then carefully remove the card
The colored water won’t mix. Hot water molecules move faster because of the heat energy, so they will float on top of cold water.
Repeat the experiment using cold water on top. The 2 shades of water will mix to create secondary colors because cold water is denser. The result? Happy kids who learned something fun about science!
9. Vanishing Egg Shell

Image source: Premeditated Leftovers
This safe activity shows kids how acetic acid in vinegar helps dissolve egg shells. This is one of my favorite science experiments to do with kids. It’s extremely easy, yet kids will want to do this over and over again!
Place an egg inside the mason jar as careful as possible. Make sure to not break the egg during this step. Then, fill the large mason jar with vinegar, but leave some space at the top (half an inch is good). Last, put on the lid of the mason jar, but make sure it’s not screwed on too tight. Gas will need to escape from the jar, so this step is very important! A loose cover is good…
Leave the jar for a few days, then remove the egg and wash it. The acid made the eggshell vanish. This activity can be done at home or in the class where kids can touch the egg and see for themselves.
10. Make A Potato Lamp
Video source: Mark’s Garage
How does chemical energy change to electric energy? Use this cool activity to explain the secrets of chemistry to kids of all ages. You will need:
- Two potatoes
- Two copper wires
- Two pennies
- Two galvanized nails
- An electric bulb
Cut a penny-sized hole in each potato and then strip one of the ends of the copper wire. Next, tie it around the penny (it’s important that the stripped end is touching the copper). Place the penny in the potato hole. Stick a galvanized nail in the opposite side of each potato and tie the end of the wire from one potato around the nail of the other one.
Connect the wire of the other potato to a light bulb and see how it lights up. Chemical reactions take place inside the potato that changes chemical energy to electric energy.
11. Paint With Salt

Image source: A Dab Of Glue Will Do
This engaging classroom activity combines science with art. You need:
- Cardstock
- Pencil and white glue
- Table salt
- Plastic cups full of water
- Food coloring
- Droppers
Fill up a few cups of water (half way) and then add different shades of food coloring to them. Write a letter or draw on a piece of cardstock. Trace over the writing with white glue.
Place the cardstock in a tray and sprinkle table salt over the glue until it is fully coated and shake off the excess. Wait until the glue dries.
Use the dropper to pick some colored water, then color the salt by dropping one drop at a time. The color is absorbed by the salt grains and spreads to create a gradient effect. Add different drops to customize your drawing. Cool, huh?!
12. Straw Flute

Image source: Buggy And Buddy
Sensory activities like this one are great because they teach kids about scientific facts while incorporating other skills. For this experiment, you need cardstock, double-sided tape and straws.
Cut 5 wide straws to varying lengths (make sure they are all different!). Cut 2 pieces of cardstock (rectangle in shape) and place a strip of the double-sided tape on each one of them. Now start sticking the straws, starting with the longer one all the way down to the shortest. Then, secure the cardstock pieces. Make sure that about an inch or so of the straw sticks out the bottom from the cardstock.
This activity teaches kids about engineering while giving them a chance to decorate their DIY flutes. It shows kids that the air particles make sounds when we blow on them. Now get the earplugs because they probably won’t stop playing with them!
13. Bubbly Ice

Image source: Life Over C’s
Using vinegar and baking soda, you can show kids how to make carbonic acid, which later breaks to water and carbon dioxide gas. The dish soap will keep the carbonic acid for a fizzy effect. You will need some dish soap, baking soda, vinegar, ice and some food coloring.
- Put the ice cubes in a tupperware container and cover them with dish soap, food coloring and baking soda
- Use a dropper to pour small amounts of vinegar on top of the ice
When vinegar touches the baking soda, they react to produce carbonic acid. This unstable acid falls apart and gives out carbon dioxide which causes the bubbly goodness!
14. Crazy Jumping Balls

Image source: The STEM Laboratory
Thanks to this experiment, kids will see how matter changes shape and characteristics due to chemical reactions. It shows how polymers form when borax and glue react. You will need:
- 1 tablespoon of borax
- ½ cup of warm water
- 2 tablespoons of white glue (make sure it’s the PVA kind!)
- 1 tablespoon of cornstarch
- One shade of food coloring
Under the supervision of an adult, add the borax to water and stir to dissolve. Then separately, add the glue to the cornstarch to create the jumping ball. Mix the glue and cornstarch well and then add it to the other bowl with the borax solution. Let it sit for about 10 seconds or so. It should have hardened up by now.
Pick up the dough and shape into a ball. Long polymer chains are flexible, and they cause the ball to bounce and jump when it hits a flat surface.
15. Ice Cubes Fishing

Image source: Science Kiddo
You can use this cool winter science experiment to explain the effects that salt has on cold things (like ice). Go grab a glass and fill it with water. Put a handful of ice cubes in it too. Then find some string and try to have them catch the ice with it. Hint: they won’t be able to catch anything!
Now sprinkle some salt on the ice cubes and have them try to fish one more time. The salt causes the ice to melt, but it freezes again trapping the string. Show kids some other scientific ways we use salt.
16. Why Do We Need To Brush Our Teeth Experiment

Image source: Feels Like Home
Kids believe what they see. This activity motivates kids to brush their teeth by showing them what happens when they don’t.
Start by explaining that eggs and teeth are made of calcium. Next, you will need some dark colored soda drinks and fruit juice to show their effect. Grape juice, Coke or Pepsi and Gatorade work GREAT for this experiment.
Get some glasses and fill each one of them with a different drink, leaving one for water (in this experiment, I’d recommend 1 with water and then 3 others with different drinks). In each glass, place one egg then store them in a cool place. Make sure you label each glass, so you know which drink was put in which glass!
Examine the eggs after 24 hours. Kids can see how colored fruit juice can cause stains, while soda will make the eggshell soft and weak.
17. Bouncy Bubbles Game
<
Video source: A Little Pinch Of Perfect
All children love bubbles, but there is nothing better than bouncy bubbles that won’t burst. The key is to add sugar to the dish soap and water mix. It holds the particles together so they can bounce.
Ask kids to wear their gloves and take the bouncy bubbles outside. They will remain much longer than the ordinary ones. Do this activity to kill time with kids while teaching them facts about the surface tension of water.
18. How Do Leaves Change Colors?

Image source: Playdough To Plato
This fall activity for kids is suitable for nature loving preschoolers and elementary students. You need:
- Some different colored leaves
- Glasses
- A mortar
- White coffee filters
- Rubbing alcohol
Cut and crush the leaves using the mortar and place each one in a glass (you can replace a mortar with something else in the kitchen that is capable to crushing). Pour the rubbing alcohol in each glass until the leaves are covered.
Then, place the glasses in a tray full of hot water to warm the alcohol (this isn’t necessary, but it helps speed up the process). Cut some strips of white coffee filter and place part of it into the glass with rubbing alcohol and the other outside. Let it rest for a few hours and let the magic happen!
Kids will have a great time collecting various leaves of different colors and shapes. The coffee filter shows how different pigments in leaves are made of multiple colors. As the weather changes, the chlorophyll breaks down affecting the pigments.
19. Stable Water Trick

Image source: Science Is For Kids
Use this activity to impress younger kids and teach the older ones about the nature of polymers. Get a plastic bag and some sharp pencils, then half-fill it with water.
As the anticipation builds in the little curious eyes, ask a kid to hold the bag steadily as you push one sharp pencil from one side then through the other side. The water will not sprout.
This experiment shows kids how flexible the polymers are and will surely impress them.
20. Open & Close Pine Cones

Image source: Parenting Chaos
Kids ask hundreds of questions and they have probably wondered why pine cones close and open. For this experiment, you need multiple pine cones, hot water, cold water and a towel.
Place an open pine cone in a bowl containing hot water. You will see that it slowly closes up. Remove it and dry it. The pine cone will open up again.
By placing it in cold water, you will see that it closes up faster. This activity is suitable for toddlers and preschoolers.
21. How Clouds Make Rain Experiment

Image source: Mrs. Jones’ Creation Station
This fun activity can be used to explain a common phenomenon for younger kids using harmless materials. You need a glass of water, shaving cream and some food coloring.
The water represents the air, while the shaving cream represents the clouds. Add some drops of food coloring on top of the cream.
Keep on adding more drops until the cloud of shaving cream gets heavy. Young learners will have so much fun watching the food coloring fall into the water.
22. Why Do We Float Easier In The Sea Or Ocean?

Image source: Science Kiddo
If your kids swim, they have probably noticed that it is easier to float in salt water than in freshwater. This easy activity explains what happens. You will need 4 glasses of water, some plastic jewels or small toys, sugar, salt and baking soda.
Stir in 2 tablespoons of salt in one glass of water. Do the same with sugar in another glass and baking soda with the last. Make sure to leave one glass filled with just tap water. At this point, it would be a good idea to label each glass, so you know which is which. Now place a jewel or two in each glass and observe.
Jewels will sink in sugary and plain water, but they will float in salty water. With baking soda, the jewels will start to move thanks to the bubbles of carbon dioxide. Why do you think this is? Learn the science behind this experiment over at Science Kiddo.
23. Make Milk Ornaments

Image source: How Wee Learn
This enjoyable activity will impress kids every time you do it. It is so easy, you can do it at home. All you have to do is use a microwave to heat up a cup of milk and then stir in 4 tablespoons of vinegar.
As the acids break the protein in the milk, it will start to make lumps. Strain the milk and use a spoon and paper towel to get rid of all the liquid.
Use a cookie cutter to shape your dough and add some food coloring. Leave it to dry for a couple of days and your milk ornament will be ready!
24. Magic Balloon Experiment

Image source: Happy Brown House
Kids will not believe this balloon experiment until they see it. They will probably think you have some magic skills after all. You need to conduct this experiment in a dark room for double the fun.
Head on over to Happy Brown House to see how to do this amazing science experiment! We know you’ll love it!
25. Make Crystal Geodes

Image source: Planning Playtime
This incredible activity is perfect for kids who are fascinated by stones and crystals. It explains how different minerals form colorful crystals that we find in nature. You’ll need:
- Water
- Eggs
- Salt
- Food coloring
Get various glass bowls and crack open the eggs carefully. Clean the egg shells and place a half in each bowl.
Boil some water on the stove and remove from the heat. Stir in salt until the water is fully saturated (you will need to keep adding more salt, until the salt stays at the bottom and doesn’t dissolve anymore). Add drops of food coloring and pour the colored solution on top of the egg shells. Pouring some into the eggshell first will help it from floating. As the water evaporates, the crystals will form.
26. Seeing Sound

Image source: Frugal Fun For Boys And Girls
Explaining the concept of vibrations to young and older kids can be daunting. This activity lets them see sound waves and what they do. You need:
- A plastic cup
- Balloon
- Salt
- A CD player
Cut a balloon and secure it over the top of a plastic cup. Put some salt onto the surface of the balloon. Now hold a CD player or a speaker next to the balloon and let the sound blast.
This is a visual demonstration of the eardrum movement and will help kids see what happens inside our ears.
27. Colorful Crystal Candy

Image source: Learning 4 Kids
This activity is not only fun, but also delicious. You will need a few basic ingredients to pull off this experiment, but luckily most of them should already be laying around the house!
You’ll need: water, food coloring, lots of sugar, popsicle sticks or any other sort of wooden stick and clips.
Unfortunately, this science experiment isn’t for impatient kids. It will take a few days for the crystals to start forming. But trust me, it is so worth it! Check out the full recipe and instructions on how to make these rock candies here.
28. Fun Edible Glass

Image source: Go Science Girls
If your kids wonder how actors break glass in movies, then you need to do this activity with them. You will need:
- ½ cup of sugar
- 40 ml of corn syrup
- 60 ml of water
- Butter
- Pinch cream of tartar
- Baking paper
Mix sugar, syrup, cream of tartar, and water in a saucepan. Heat the mixture slowly.
Get a baking tray and line it up with baking paper and grease it with butter. Pour in the molten sugar mixture and let it cool. The molten sugar grains have turned into a transparent glass sheet.
This is a fun science experiment that can help kids understand how see-through glass is made of the opaque sand particles.
29. Shiny Crystal Easter Eggs

Image source: Teach Beside Me
This activity is great for Easter parties. You will need some egg-shaped Styrofoam, borax, food coloring, hot water, paper clips and glass jars.
Fill 2/3 of the jars with hot water, then stir in some borax (anywhere from ¼-1/3 cup is fine). Add food coloring and stick the ends of paper clips into the eggs (the big kind of paper clips work easier for this). Hook the ends to keep the eggs stable.
Styrofoam eggs float, so fill in another jar with marbles or something heavy to push the egg under the level of the colorful solution. After 24 hours, pull them out and let them dry. These eggs can be used for decorations and kids will love to play with them.
30. Rainbow Glitter Decorative Jars
Video source: Fun-A-Day
Kids love the things they make. This activity combines science with art to create some cool decorations. You will need clean glass jars, light corn syrup, glitter liquid watercolors, glitter and water.
To learn how to make these rainbow glitter jars above, be sure to visit Fun-A-Day!
31. Juice Noodles

Image source: Teach Beside Me
Even if your kids are not fond of juice or noodles, they will love this cool activity. Here are the supplies you need:
- Sodium alginate and calcium chloride (you can buy these from a chemical supplies store or on Amazon)
- Blender
- Juice
- Strainer
Mix up 1 teaspoon of sodium alginate with 1 cup of juice in a blender. As it starts to thicken, keep blending until all lumps are gone. Let this sit for about an hour or until the majority of the air bubbles are gone.
In a separate glass baking dish, mix in some calcium chloride into plain water to make the noodles. A teaspoon or two should work. Just make sure to mix it fully in the plain water.
Now, using a syringe or a baster, pick up some of the juice and slowly squirt it into the calcium water. The calcium chloride will turn it into a gel. Rinse the gel strings in plain water. This is basically the same process to make boba balls too!
Since all the materials used are edible, kids will love to eat the juice noodles. You can also explain the power of chemical reactions.
32. Friendship Threads Sensory Bottles

Image source: The OT Toolbox
This science activity allows kids to create attention-grabbing sensory bottles that can be used as gifts or decorations using a few affordable materials. You will need:
- Various colors of friendship threads
- Water
- Clear body wash
- An empty clear water bottle
- Clear glass marbles
Fill in the bottle with 1 to 2 inch long friendship threads (you will need to cut these) and about a half inch or so of body wash. Then add the water on top. Suds will/should form, so keep on adding more water until all the suds have poured out of the bottle.
Secure the lid and have kids shake the bottle. After the bubbles have settled, add the glass marbles and watch the threads move.
33. Marble Oil And Water Paintings

Image source: Stay At Home Educator
Let kids get creative using materials from the kitchen. You will need water, food coloring, cooking oil, heavy paper and a dropper.
Mix water with food coloring and pour the mixture into a rectangular baking dish. Pour some oil in a separate bowl. Use the dropper to add small drops of oil on top of the colored water or mix them both for a marbleized effect. Just make sure to not add too much oil, otherwise the paper will most likely only pick up the oil!
Place the paper on top of the mixture and then put it on a rack to dry. This activity is perfect for curious toddlers and preschoolers. Older kids will learn that oil is less dense than water.
34. Moving Goo

Image source: Frugal Fun For Boys And Girls
This is a chance to prove to your curious audience that you can make things move. Just mix some cornstarch with oil to prepare some gooey slime and your experiment will be ready.
Blow up a balloon and ask kids to rub it against their hair to charge it with static electricity. They will love to take part in the show. Then, take a spoonful of the goo and hold it close to the balloon and see how it jumps.
The electrons from the hair charge the balloon and the static electricity does the rest. But to their eyes, you are an unbeatable magician.
35. Salt Frosty Leaves

Image source: Schooling Active Monkeys
Use salt to create the crystallized effect of frost in this fantastic activity. Kids will love the combination of art and science for frosty leaves that they can use for decorations. You need some pipe cleaners, mason jars, salt and fabric leaves.
Get two mason jars and fill them all the way up with water. Then, take that water from both mason jars and dump it into a saucepan to start boiling.
While you are waiting for the water to boil, make a hole in each fabric leaf to fit a pipe cleaner. Put a pipe cleaner through the middle hole and then attach it to a plastic fork or spoon. Put the lead into the jar and suspend it using the fork or spoon. The fork or spoon should be laying across the top of the jar. You should be able to fit two leaves in each jar.
When the water boils, add salt to create a sheet of salt crystals. Then, pour the hot water into the jar.
Leave the jars for 3 days until the crystals stick to the fabric. Remove the leaves and let them dry.
A highly saturated water solution pushes the salt crystals to stick together. When the water evaporates, they stick to the fabric.
36. Magic Popcorn

Image source: Little Bins For Little Hands
All kids love popcorn, right? This safe experiment is suitable for preschoolers as well as older students who struggle with chemistry.
Use popcorn to show kids how chemicals react. All you need is water, vinegar, baking soda and popcorn kernels.
Half fill a glass jar with water and stir in 2 tablespoons of baking soda. Add some popcorn kernels then pour in the vinegar slowly. The produced carbon dioxide bubbles will make the popcorn kernels move inside the jar.
37. Fun Fizzy Waterfalls

Image source: Happily Ever Mom
Kids love fizz. Now you can show them how different materials react together to create a fizzy waterfall. All you need is some mega blocks, baking soda and vinegar.
Ask kids to build a structure, but the funny part is that it should be upside down. Fill the blocks with baking soda then use a dropper to squirt some vinegar. Watch as the fizziness take over.
This is an incredible sensory activity, where kids can build, hear and watch how things happen.
38. Magic Pepper
Video source: Coffee Cups And Crayons
For children, science looks like magic. The supplies you will need for this experiment should already be found in your kitchen. You need some pepper, a plastic plate, water and dish soap.
Fill the plate with colored water (just add a little blue food coloring to water), then sprinkle some pepper on top. The pepper floats and doesn’t sink. Now try dipping your finger into some dish soap, then touch the center of the plate. Watch what happens as the pepper will start to move magically to the sides of the plate!
The soap changes the surface tension of water, so the pepper moves. Watch as kids gasp in awe. This enjoyable activity will make them laugh as you illustrate the concept of cause and effect.
39. Underwater Sound Experiment

Image source: Still Playing School
On those fun summer days, kids have probably heard different sounds while going under the water in the pool. Show them this experiment to explain how whales and dolphins hear different sounds in the sea.
Get a bucket and fill it with water, then cut half of a plastic water bottle. Submerge half the bottle into the water and have someone clink some knives under the water.
Let the kids hear through the bottle. They sound even louder and even better under water!
This easy experiment is used to explain that sound travels better through the water.
40. My Cereal Is Alive Experiment
Video source: Steve Spangler Science
If your kids are fond of magnets, you can use this simple activity to encourage them not to miss breakfast. All you need is some breakfast cereal (must have iron in it like the cereal called Total) and a magnet.
Pour some cereal or flakes on a plate. Crush them into tiny pieces, then move a magnet over the finely crushed layer. If the cereals are iron fortified, they will start to move.
You can also put a bunch of iron fortified cereal flakes into a big zip lock bag and crush them with your hands. Then fill the bag about 3/4 of the way with water and seal. Put the magnet against the zip lock bag and shake for 10 seconds or so. Now take a peek under the magnet and you should see iron that has gravitated toward the magnet! They will never miss breakfast again!
41. No Mold No More

Image source: Life With Moore Babies
Teach kids how food goes bad, so they can always stay healthy using this simple science activity. You need:
- Baggies
- Bread (6 pieces)
- Water
- Several additives (sugar, salt, vinegar and oil)
Dissolve sugar and salt in different plates that contain water. Take different slices of bread and coat each one of them with a preservative (listed above), covering one with just plain water and also one with nothing. You should now have one plain piece of bread (non-coated), one that is coated with just water, one coated with sugar water, one coated with salt water, one coated with vinegar and one last coated in oil.
Place them in secured baggies and store them in a warm place (must be warm! Mold will grow faster where it’s warm, otherwise, this experiment may take much longer). Kids can observe as the mold grows on the bread covered with just water first.
Sugary water caused the mold to grow even faster, while the oil, salt and vinegar coated bread prevented mold growth. This activity teaches kids about the importance of storing food in cool, dry places.
42. Sink Or Float Activity

Image source: A Dab Of Glue Will Do
Kids can learn about the density of various liquids using balloons. Fill 3 glasses with water. Pour oil, dish soap and water in 3 balloons.
Dish soap is denser than water, so the balloon will sink to the bottom. Oil has a lower density and the balloon will float.
The water balloon will get suspended because the water in the cup has the same density. Preschoolers and kindergarten kids will love this activity.
43. Water Rainbow

Image source: The STEM Laboratory
Create a fun rainbow using colored water for preschoolers and toddlers. Grab 6 jars or cups and fill with water. Then add enough drops of food coloring to each one to your desired color. In each of the jars or cups, fold sheets of paper towel, so they go from one glass to the next.
Arrange the glasses in a circle and see how the water travels through the paper towel.
This experiment can be used to explain the capillary action as well how to make secondary colors. It also looks super cool.
44. Hot Chocolate Heat Activity

Image source: Creative Family Fun
For those cold nights, this activity can teach kids how particles dissolve faster in hot liquids. Grab three heat-proof mugs and empty a sachet of instant hot chocolate in each one. Use ice water, room temperature water and hot water to fill each mug respectively.
Using a stopwatch, kids can observe that it takes more time for the particles to disappear in cold water. This activity teaches elementary students that heat energy makes the water molecules move faster, creating gaps to break down the hot chocolate particles.
45. Green Pennies

Image source: Buggy And Buddy
Kids love to observe and take notes. Now you can show them how ordinary pennies can magically turn green using one ingredient: Vinegar.
First, you will put a paper towel in a dish then arrange some pennies on top. Pour vinegar until the paper is fully saturated. Kids can observe the pennies as they magically turn green! This may take a few hours or days to turn green.
Explain the nature of the chemical reaction that takes place when the vinegar touches copper. Tell them that the resulting malachite compound is the reason why the Statue of Liberty looks greenish blue.
Try something similar that will change the outcome of the experiment! Add some vinegar and salt to a cup and then throw in a few pennies. Rinse them off good and see what happens now with the additional of salt!
46. Funny Peeps Activity

Image source: Gift Of Curiosity
Peeps are delicious, but you can use them for an excellent science activity too. If you can’t find them, you can use any gelatin candy. Fill 3 glasses with water, vinegar and soda respectively. Put the piece of candy in each one of them and leave them for a day or two.
After a couple of days see how the vinegar causes a fizzy reaction, while the soda makes the candy really soft. This activity shows kids the different effects of various liquids.
47. Silver Egg Experiment

Image source: I Game Mom
Did you know that you can change a regular egg into a silver one using only fire and water? Here is what you need to do:
- Hold an egg near the flame of a candle until it is covered in soot (the black stuff!)
- Use a skewer to hold the egg and put it in a jar filled with water
When we observe the egg through the water, it looks like a shiny silver egg. Kids love shiny stuff and they will love to see how black changes to silver because soot repels water.
48. DIY Balloon Rocket

Image source: Discover Explore Learn
If your kids love space, then they will admire this DIY rocket. Start by tying yarn to the back of a chair, thread it through a straw, then to the back of another chair.
Attach 2 pieces of tape to the straw then stick the balloon, but make sure that you don’t let it deflate. Pull the balloon to one chair and let go of it. Watch it zoom across the yarn.
This balloon works the same way a rocket does. The air provides enough power to push it in the opposite direction. Kids will love their rocket balloon experience.
49. Moving Fish Activity

Image source: Deceptively Educational
This DIY activity is used to teach kids about the concept of surface tension. Ask kids to cut fish shapes out of white craft foam, making a rectangular cut in the fin. Fill a baking dish with water and put the fish on top. They won’t move!
Now add a drop of dish soap to the notch in each fin and watch as the fish move forward. Explain that the dish soap disrupts the surface tension of the water molecules. This is also an art activity as kids can customize their fish.
50. Hot Ice Tower

Image source: Frugal Fun For Boys And Girls
This is the perfect activity for those boring afternoons because it takes time. But the results are extraordinary!
For every tablespoon of baking soda, you need a cup of vinegar. Boil on low heat until it is reduced. There will be some crystals in the pan.
Pour the reduced solution into a glass jar and put it in the fridge. Then, put these crystals in a plate and pour the cold solution slowly on top of them. A hot ice tower starts to form in front of your kids’ amazed eyes.
51. Disappearing Colors

Image source: Mess For Less
Children are fascinated with colors. Now think of vanishing colors, wouldn’t they love that? Ask kids to add drops of food coloring to different see-through cups that contain water.
Now it is time for magic, so use a dropper to add drops of bleach to each cup. The colors get lighter until they disappear. Experiment with different amounts of food coloring.
This is a perfect activity for parties and playdates. But an adult should handle the bleach to avoid unnecessary accidents.
52. Sugar Yeast Balloon

Image source: Tinker Lab
If kids love to watch you bake, you can use sugar and yeast to show them how chemical reactions take place.
Pour 2 tablespoons of active dry yeast into a bowl of warm water, then add some sugar. Stir until it dissolves and pour the mixture into a plastic bottle. Cover the bottle with a balloon and watch it inflate.
This is a safe activity for preschoolers and toddlers because you are using edible materials. Moreover, kids will see, touch, and smell while observing, so they can grasp the concept of the activity.
53. DIY 3D Magnetic Field

Image source: Rookie Parenting
Are your kids struggling with understanding the basics of physics? Explain the power of a magnetic field using this DIY 3D model.
First, you will need to arrange several strong magnets on either side of a transparent plastic jar. Fill the jar with iron filings (you can buy them here!) and see how they organize themselves. Kids will be fascinated by how the filings defy the power of gravity as they grasp the basics of magnetism in this DIY 3D model.
54. Paranormal Dry Paper In Water

Image source: Simple Play Ideas
Ask your child to predict what will happen when you put a paper towel in water, then surprise them with your magic abilities.
Scrunch a paper and put it in the bottom of a glass. Fill a bowl with water then flip the glass upside down. Put it inside the container then remove it.
The paper stayed dry because of the air inside the glass. Use this activity to teach your students or kids at home critical thinking skills as they make predictions and see the results.
55. Arctic Animals Activity
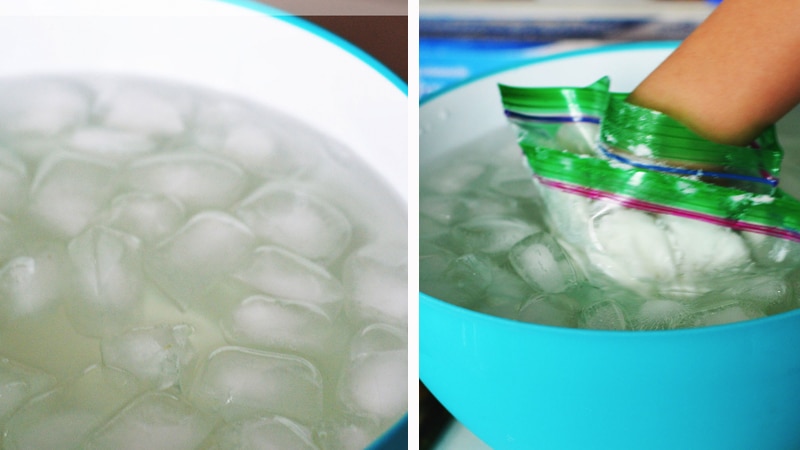
Image source: Forgetful Momma
This sensory activity is suitable for preschoolers and elementary kids who love animals. All you need is water and vegetable shortening.
Put a bowl of water in the freezer until it is really cold, then add some ice cubes. Ask kids to touch it carefully from the outside to see how cold it is.
Next, let them put their hands in zip lock bags to avoid the mess. Wrap a bar of shortening around their hands, then add another bag before they stick them in the icy water. The shortening or fat keeps their hands warm, the way it does under the skin of arctic animals.
56. Homemade Butter

Image source: 123 Homeschool 4 Me
Kids love to put butter on their toast. Show them how to make butter in a jar using cream. Pour some heavy cream in a jar and secure it well. Then ask kids to shake it. Keep shaking….keep shaking….until….
Little balls will start to form and the liquid will get lighter. Strain it and you are ready to go! Explain how the fat cells in the butter are held together thanks to a thin membrane that breaks upon shaking. Kids will love to eat their homemade butter and it will taste great too!
57. Colorful Beads In Water

Image source: Fun Learning For Kids
There are lots of oil and water activities, but we can never get tired of them. You will need water, food coloring and some baby oil (or really any kind of oil should work) to get started.
Add some food coloring to several cups of water. Half fill another glass with oil, then use a dropper to pick some of the colored water and add them to oil.
Explain how oil molecules don’t mix with water and how oil floats on top of the water. The colors make everything seem more fun!
58. Shrinking Egg Activity
Video source: Science Sparks
How does heat change the way air molecules behave? Use a boiled egg to answer this question.
For this activity, you will need a boiled egg placed on top of a glass jar. Make sure that it doesn’t fit.
Remove the egg and light up two matches. Place them inside the jar carefully. Quickly, put the egg back and watch it fall.
Science tells us that when the air heats up, it expands and some of it escapes. When the matches go out, the air cools and the pressure inside the jar drops.
The outside air now has a higher pressure, and it forces the egg down. Let kids repeat the experiment using more or fewer matches to record their observations.
59. Grapes Activity

Image source: Rookie Parenting
Show kids that the same object acts differently in various mediums. Fill 2 glasses with tap water and add a significant amount of salt to one of them and stir. Now add 2 grapes to each one of them and see what happens.
Kids will see that grapes will sink to the bottom of the glass containing tap water but will float in salt water. This experiment shows kids that salt water has lesser density and this is why objects float.
60. Dragon Fire Activity

Image source: Kid Minds
If your kids love stories about dragons, then they will definitely enjoy this activity. Show kids that the color of flames depends on what is burning.
For this experiment, you need boric acid. Mix it with an antifreeze (like HEET, which can be found on Amazon) in a fire-proof container and let the fun begin. Give it a light and watch the magic dragon erupt!
This is a great experiment for kids who hate science and think that it is boring. An intriguing activity like this one will make them curious and eager to what to know more.
61. Soda Mentos Fireworks

Image source: Education.com
All these legends about soda and Mentos are true. Now you can show your kids this fun activity in the backyard!
Grab a bottle of soda and a roll of Mentos. The 2 liter soda bottles work best! Open the lid of the bottle and help your child empty the Mentos inside as quickly as possible. Stand back and let your kid enjoy the fireworks. I find that by letting a little soda out of the bottle first, allows you to fit more Mentos in, which will make the eruption even bigger!
Explain the science behind this amazing phenomenon as lots of carbon dioxide is pumped into the soda under pressure. The Mentos disrupt the bubbles and cause the fizz and a fireworks display that kids will love.
62. Mysterious Water Activity

Image source: Teach Beside Me
A fun science experiment is the easiest way to explain complicated phenomena to kids. For this activity, you will need to stick three matches into a cork and place it in a plate filled with water.
Light up the matches, and put a glass on top of them. The water will rise in the glass to blow off the matches.
This activity provides an explanation for storms where warmer air molecules move faster than colder air. The air pushed the glass forcing the water to rise.
63. Separating Salt & Pepper Activity

Image source: Science Kiddo
All the supplies needed for this experiment are safe and can be found in your kitchen. Sprinkle some salt and pepper on a piece of colored paper (black paper is good!). Tell kids that you can separate them again and watch as they gasp.
Rub a plastic spoon on a dishcloth to charge it with static electricity. Hold the spoon and watch as the pepper particles stick to it.
Explain that because pepper particles are lighter, they will stick to the spoon. Or take advantage of the situation and let them believe you’re a magician.
64. Magic Electric Dancers

Image source: Babble Dabble Do
This experiment is fun and suitable for kids of all ages. Older kids will find it unbelievably fascinating because they can see the power of electricity.
It’s a bit tricky, so this experiment is likely best suited for older kids. Otherwise, adults can help do this for the younger ones. You’ll need the following to pull this off:
- Copper wire (it’s pretty cheap and can be found here)
- Some small circular magnets
- 1 double A battery
- Pliers
Now head on over to Babble Dabble Do to get the full instructions!
This experiment sheds light on the basics of electromagnetism and electricity. But younger kids will also find it intriguing too!
65. Burning Ice

Image source: Schooling Active Monkeys
Kids will be amazed that you can set ice cubes on fire. Just get an ice cube, rub it with rubbing alcohol, then use a lighter to set it on fire.
This activity should be done under the supervision of an adult and safety goggles are necessary. You can explain how alcohol is flammable and this is why they should never get it close to fire or flames.
66. Color Changing Solutions

Image source: Left Brain Craft Brain
Don’t you love it when kids are watching you with great admiration? Why not teach them a bit of science in the process? You will need:
- Tincture Iodine 2%
- Hydrogen Peroxide 3%
- Vitamin C tablets
- Cornstarch
- Warm water
Crush some vitamin C tablets and mix them with warm water. In another cup, pour some water, add 1 teaspoon of hydrogen peroxide and some cornstarch.
Add one tablespoon of iodine to the first cup and watch as it becomes colorless. Now pour it on the cloudy solution, and you will see it turns blue.
Add more crushed Vitamin C tablets and the solution will become colorless again. This activity shows the nature of reversible chemical reactions and will impress your kids or students every time.
67. Underwater Volcano

Image source: Raising Dragons
Show kids a cool explosion to keep them busy and teach them about changes in density. Fill a large container with cold water and a smaller one with hot water. Place a rock at the bottom of the small one.
Add some food coloring to the hot water container and carefully put it into the larger one. Watch and observe the cool eruption.
Hot water molecules move fast forcing the food coloring to the top. This makes physics easier to learn.
68. Write With Invisible Ink
Video source: Apologia
Now your kids can create secret messages to each other with this cool science experiment! It’s so easy to do that you’ll only need 3 ingredients. You may even have these in your kitchen already. Grab some baking soda, warm water and grape juice.
Then get a glass or cup and mix together some baking soda (about 1/4 cup is good) and the same amount of warm water. Mix well and try to get as much of the baking soda dissolved.
Now, grab a paint brush or cotton swab (something to write with) and use the baking soda water to doodle away on a piece of white paper. Thicker white paper is recommended, but normal white paper should work too.
Wait about 30 minutes for things to dry before you can start the magic! Once the message has dried, you can now use a separate paintbrush or cotton swab to brush grape juice over the white paper. Watch as the secret message is finally revealed!
69. DIY Parachutes

Image source: Relentlessly Fun, Deceptively Educational
This is an excellent activity for a breezy afternoon in the playground or back yard. Make 4 holes in a plastic cup under the rim. Cut a kitchen garbage bag into a square and cut enough string for your parachute.
Tie the ends of the string to the 4 holes in the cup and the plastic bag. Now go to the outside and throw the parachute. Let kids see how it slowly falls to the ground.
Explain that the air resistance or drag lets the parachute fall slowly, defying gravity. Kids can decorate their bags using sharpies for an artistic effect.
70. Tea Bag Burning Ghost

Image source: Playdough To Plato
This straightforward activity should be done under the supervision of an adult. It is suitable for ages 4 and up. All the supplies you need are found at home or can be effortlessly brought to the classroom. Empty a tea bag and unfold it. Make it stand on a plastic plate and light it.
Kids will be impressed to see that the cloth will fly in the air and vanish like a ghost. Explain that the air gets hot so it rises above the cold air. Kids will learn about physics as they watch the vanishing ghosts.
71. Soap Explosion Activity

Image source: Simple Play Ideas
Sensory activities are suitable for toddlers and preschoolers and they are also used to teach about the properties of matter. Get a soap bar and ask kids to touch it.
Microwave the soap bar for 90 seconds and let it cool down. Ask kids to see how the soap turned fluffy and soft.
Using this activity, you can teach older kids how heat from the microwave changes the way molecules are arranged, softening hard materials. They will love to play with the fluffy soap.
72. Glitter Germs

Image source: Living Life And Learning
Fun science activities are the most accessible tools to explain the importance of basic sanitary habits to kids. Show them the importance of washing their hands to keep germs away.
Put some water in a shallow plate and sprinkle glitter on top. Add some dish soap and watch as the glitter particles move away.
As the dish soap disrupts the surface tension of water, kids can understand that soap can make germs move away. They will never argue about washing their hands.
73. Magic Arrows

Image source: Go Science Girls
This is an excellent classroom activity for older students, but 5 and 6-year-olds can have a go too. Draw any shape on a piece of paper, then look at it through a glass filled with water. The image points to the opposite direction.
This experiment is a simple demonstration of the refraction of light. Although physics concepts can be confusing, seeing is believing. Explain that the light bends when it passes through transparent objects. Ask kids to move closer or further and take notes of the changes they see.
74. Make Your Sun

Image source: Fumbling Through Homeschooling
Are you looking for a perfect activity for aspiring astronauts? This is a fun, educational activity that you can do using water, oil and food coloring.
Half fill a bottle with oil. Mix some red and yellow food coloring with water then fill the rest of the bottle with it. Secure the lid of the container using hot glue and make sure to twist nice and tight. Ask kids to shake the bottle and observe the swirling inside.
Explain that the sun is made up of gases that react and explode all the time. Once the bottle settles, ask them to shake it again and let them enjoy it.
75. My Dancing Wireman

Image source: Arvind Gupta Toys
Help kids make this DIY toy while teaching them something about science. It is straightforward and can be done with preschoolers as well as older kids.
Craft a man model from wires. Secure the ends to a pipe cleaner, then twist it to form a circle. Get a plastic cup and press a dozen staples on the side. Now place the pipe cleaner circle on the inverted cup.
As you rub the staples using a pen, your wireman will start to dance. Explain how energy travels through different materials. The sound vibrations from the staples will make the wire move.
76. Rainbow Milk

Image source: Busy Creating Memories
To prepare some mind-blowing rainbow milk, you will need whole milk, food coloring and some dish soap. Pour some milk into a plate and add drops of different shades of food coloring to the center of the dish.
Add a drop of dish soap to a Q-tip and touch different parts of the plate. This activity can be done as a science fair project or to entertain young artists.
Explain that similar molecules stay together and this is why the food coloring doesn’t move unless the soap changes the surface tension.
77. Glowing Ice Cubes

Image source: Growing A Jeweled Rose
If your kids love the Glow-in-the-Dark colors, then they will fall in love with this activity. Put some glow-in-the-dark paint in an ice cube tray. Fill it with water and mix well then put it in the freezer.
Now grab the ice cubes and hold them up to a light to get them nice and charged. Then, put them in a plate filled with oil. The glowing cubes will melt in the oil creating a mesmerizing effect. To enhance the glow effect, try using a black light! This is an incredible sensory activity that combines scientific facts with art.
78. Spooky Diving Ghost

Image source: Schooling Active Monkeys
This diving ghost will not scare kids off. It will teach them something about the properties of water and air. Cut 1/3 of the stem off of a dropper, then half fill it with water and seal it using hot glue. Stick a penny to add weight to the bottom of the dropper while the glue is still hot.
Now, fill a plastic bottle with water and place the dropper in. Put on the lid and squeeze the bottle. Watch the dropped slowly sink to the bottom!
To make this experiment more fun, cut a square of a plastic bag and make a ghost face on it. Then attach it to the dropper.
Place the dropper back in the bottle and squeeze it. The spooky ghost will move and sink to the bottom. This paranormal activity can be explained using science because when you press, the pressure inside the dropper increases so the ghost go down. Let go and the ghost will fly back to the top!
79. Color Mixing Flashlights

Image source: Teach Beside Me
We all love the colors of the rainbow, but how can they change to the white color we see? To explain this phenomenon, you will need 4 flashlights and 4 colorful cellophane sheets; red, yellow, blue, and green.
Wrap a sheet on top of each flashlight and go in a dark room. See how different primary colors mix to make secondary colors. Mixing blue, green and red will give out the natural white color of light.
This experiment is fun for toddlers, but will teach older students about the properties of light. Let them experiment with numerous color combinations.
80. How To Stop Ice From Melting

Image source: Frugal Fun For Boys And Girls
Using this activity, you can explain that a few simple hacks can stop ice from melting.
- Ask kids to use different materials to line the interior of several glass bowls. Use bubble wrap, a towel and Styrofoam.
- Put an ice cube in each bowl. Seal them and observe.
Some materials like Styrofoam provide excellent insulation and protect the ice from melting. Kids will experiment with different insulation materials to decide on the best and they will also see the effect of heat on matter.
81. Magic Egg Walk

Image source: A Dab Of Glue Will Do
Kid already know that eggs are easy to break. But using this activity, you can make them magically walk on eggs.
- Line up several cartons of egg creating a short path
- Ask kids to walk slowly without pushing their heels too hard
Kids will be able to walk on eggs without breaking them, but every egg smashed will result in good laughs. Explain that the curved shape of eggs distributes the pressure evenly.
82. Amazing Dry Ice Ball

Image source: Science Kiddo
Get kids ready for this mind-blowing activity. Pour some food coloring into a bowl of warm water, then add a chunk of dry ice. Mix some dish soap with water in a separate cup and place a piece of fabric inside.
Wring the fabric and pull it out. Slowly move it across the rim of the bowl. A film of soap begins to stretch under the fabric.
Explain that the inside of the bubble is filled with carbon dioxide and water vapor. Watch as kids try to foresee the future before the bubble explodes with lots of giggles.
83. Lava Lamp Activity
Video source: Fun With Mama
Kids love to watch lava lamps, right? They are so mesmerizing! This activity is suitable for kids of all ages. Mix water with different shades of food coloring in 3 different cups. Half fill three more cups with oil.
Pour the water on the oil and watch them separate. Now break Alka Seltzer tablets into 4 pieces and throw them into the cups. Go to a dark room and see how the fantastic lava lamps look when you put a flashlight under the cup.
Thanks to the difference in density, the lava lamps will have 2 different sections. The fizziness is a bonus to this cool color activity.
84. Magic Oobleck

Image source: Steam Powered Family
Kids and even adults enjoy playing with oobleck. It is a non-Newtonian fluid that can be used to explain Newton’s law of viscosity. But in this experiment, we will focus on nothing but fun.
- Blend chopped red cabbage with hot water
- Mix ½ cup of this PH indicator (the juice from the blended up red cabbage) with 1 ½ cup of corn starch
- Mix some baking soda with water in a cup. Put some vinegar in another cup
Divide your oobleck into two sections and add drops of acid and base to each one respectively. Vinegar makes the purple oobleck turn pink while the baking soda makes it turn blue.
This is an excellent activity to show the nature of acids and bases. Younger kids will love it, but older kids will use it to relate to the basics of chemistry.
85. Pencil Optical Illusion

Image source: Rookie Parenting
Amaze young kids with the refraction of light by placing a straw in a glass of water. Look at the straw from the side and see that it appears broken.
Lower your eyes, and see that from the bottom it looks bent. Explain that when light travels from air to water, it refracts which makes the straw look broken.
When we look from the bottom of the glass, total internal reflection happens where the water surface acts like a mirror. This experiment can teach kids about the properties of light as it passes through different mediums.
86. Snow Storm Activity

Image source: Growing A Jeweled Rose
If kids are unable to go outside because of the snow, you can make the best of your time at home by making this DIY snow storm.
Fill a jar with oil until it is ¾ full, then mix some water with white paint in a bowl. Add the water to the oil and ask kids to sprinkle some glitter. Add some blue food coloring and let everything settle.
Break an Alka Seltzer tablet into the jar and watch as the storm takes over. This is a useful activity for preschoolers and toddlers that help them understand natural phenomena. Add more tablets for more fun.
87. Erupting Elephant Toothpaste

Image source: Preschool Powol Packets
This activity can get too messy, but this means more fun for the young ones. Mix warm water with yeast to make a paste. Then mix hydrogen peroxide (8% or 20%) with water in a soda bottle. The higher the percentage, the bigger the explosion will be.
Add some drops of food coloring and squirt some dish soap. Now pour the yeast paste into the bottle and watch as the toothpaste explodes.
Kids will love all the fizz and mess, but older students can relate to the chemical reaction. The soap catches the oxygen in the hydrogen peroxide to cause an explosion that releases heat as well.
88. Cold Fire Balloon Activity

Image source: Digital Bits Science Lab
Ask kids what happens if you put a burning candle next to a blown up a balloon, then show them a scientific experiment that will blow their minds away.
Half-fill a balloon with water, then blow it up. Hold it next to a burning candle and watch as the balloon stays intact.
This can be a fun activity for any kid, but can also be used in a science class to describe how the water absorbs the heat. It is a simple activity to demonstrate the basics of heat conductivity.
89. The Balancing Stick

Image source: Rookie Parenting
Use this activity to explain the nature of gravity using a craft stick, chopstick, a pipe cleaner and 2 pegs.
Wrap the pipe cleaner around the craft stick and clip a peg to each side. Balance the craft stick on a chopstick. It will stand upright because the pegs will create balance.
This DIY activity shows how a change in the center of gravity will stabilize the stick. It can be done in the classroom or at home.
90. Paper Volcano Eruption

Image source: The Happy Housewife
Using some simple materials, you can make a DIY volcano that will impress everyone.
- Cut a circular piece of cardboard to be the base of your volcano. Make a few cuts on the edge of the circle
- Glue a plastic bottle to the center of the cardboard. Tie a piece of yarn around the top of the bottle and through the notches of the circle
- Mix water and flour to make paper mache paste. Dip newspaper sheets in the paste and stick them on the strings
- Color the newspaper sheets and put some vinegar in the bottle
Now your volcano is ready. Place some baking soda inside the bottle and wait for an explosion. Due to the chemical reaction, your volcano will erupt.
91. Birds Activity

Image source: How Wee Learn
Curious kids are amazing. You can use this fun experiment to answer some of their questions. All you need to do is to cut different straps of construction paper and draw bird shapes on them. Now ask your little ones to hold their birds in front of a fan.
Folding the paper into a “V” shape makes it able to resist the wind. Use this simple activity to demonstrate why birds travel in a “V” shape and let them observe birds in nature. It is always great when they can learn by themselves!
92. DIY Solar Chimney

Image source: Almost Unschoolers
This is a cool DIY project that teaches kids about solar energy. You can make a solar chimney using empty tin cans with the bottoms and tops removed.
Make an arch with wire and stick a straight pin. Rest the tins on books so that air can flow from underneath. Make a pinwheel using paper and place it on the pin. It will start to spin.
This activity shows how the solar energy from the sun warms up the air and drives it up. Even younger kids who can’t understand the scientific concept will enjoy the spinning.
93. Magic Pencil
Video source: Sick Science!
This activity is suitable for both younger and older kids. Fill a bottle with uncooked rice and push a pencil or chop stick all the way to the bottom.
Lift the pencil or chop stick and you can see that the rice is stuck to it. Repeat the process. Explain that when you push the pencil several times, grains of rice stick together creating friction.
The resulting static electricity sticks rice to the pencil. This is an easy experiment to explain resistance and friction using a few supplies.
94. Tornado In A Jar

Image source: One Little Project
Tornados are fascinating. Use this activity to show kids what happens. All you need is a jar filled with water and a drop of dish soap.
Leave the mixture to settle and rotate the jar in circles. A little soap will cause a tornado-like movement with no frost. Layers of water will move in different directions due to the friction against the glass.
This resembles how the tornado vortex happens in real life. Expect kids to keep on playing with it for a long time!
95. Fluffy Slime Activity

Image source: Raising Lifelong Learners
Create the perfect fluffy slime, while explaining some scientific facts to students and kids at home.
- Add 4 ounces of glue and 1 ounce of shaving cream. Pour some food coloring and stir the mix
- Add ½ cup of liquid laundry starch. Keep on adding until it feels fluffy
Adding the shaving cream makes this slime fluffier than usual. It creates long polymer chains and can be used to demonstrate how flexible plastic is made. Let the kids have a blast playing with their slime.
96. Fluorescent Potato Mud
Video source: The King Of Random
Kids are always fascinated when you explain that our food is rich with chemicals that have unbelievable properties. Grab some potatoes and chop them as small as possible. Put them in a bowl and cover them with hot water.
Use a strainer to separate the potatoes from water. You will see that there is a white layer at the bottom of the bowl. Mix some of your white powder with tonic and watch the magic.
Turn on some black light and see that it glows. Explain that the quinine in the tonic reacts with the starch to make this fluorescent mud.
97. DIY Water Xylophone

Image source: Little Bins For Little Hands
This is a fun sensory activity that can be tailored to suit toddlers as well as older children. Fill several mason jars with water by adding a different amount of water.
Experiment with numerous shades of food coloring to customize your music instrument. Let kids tap the jars using wooden sticks.
This is a great experiment to show how the vibration creates sound. Have them empty the water for more high-pitched sounds and add more water for low-pitched sounds.
98. Air Pressure Experiment

Image source: Kids Activities Blog
Trying to explain the concept of air pressure can be tricky, especially to younger kids. Use 2 kitchen sponges to demonstrate air force.
Place the two sponges in a zip lock bag with a straw in between. Zip the bag and seal it properly. Blow on the straw to fill the bag with air.
Place a pom-pom in front of the bag and press it. For younger kids, it may be hard to explain that the space around us is filled with powerful air. Show them this activity to explain this phenomenon.
99. DNA Extraction In The Kitchen

Image source: Research Parent
If your kids are old enough, they have probably heard about DNA. You can use some kitchen supplies to demonstrate how it is extracted from a strawberry.
- Seal a strawberry in a zip lock bag and squish it
- Mix some water, salt and dish soap
- Add this extraction solution to the mashed strawberry
- Make a strainer using a glass, rubber band and a paper towel
- Strain the mixture. Add some cold alcohol to the juice extracted
You can use a skewer to pick the swirling DNA. Kids will love to see the swirling DNA. Talk about how our DNA makes us special and unique.
100. DIY Thermometer

Image source: Kiwi Co
A thermometer is a device used to measure temperatures. Help your kids make their own thermometer using rubbing alcohol.
Mix some red food coloring in a bottle containing rubbing alcohol and also put some in a small dish or bowl. Use a balloon to secure the end of the bottle. Cut a small slit in the balloon and insert a straw until the tip is submerged in alcohol. Use a dropper to add alcohol into the straw.
Now your thermometer is ready. Place it in icy and hot water and mark your recordings. Kids can use this DIY thermometer to measure the temperature in the room. They will have so much fun!
Related Posts